![]()
Creating a Task via the Task Folder
Accessing the Tasks Folder
To access the Tasks folder, follow these steps.
1. From the workarea, click the Reports tab.
2. Click the Tasks folder.
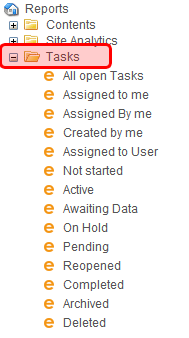
3. The following subfolders appear:
All Open Tasks - all tasks whose status is open
Assigned By and To Me - tasks assigned to you and those that you assigned to someone else
Assigned To Me - tasks assigned to you
Assigned By Me - tasks that you assigned to someone else
Created By Me - tasks you created
Assigned To User - search for tasks assigned to a user
Not Started - tasks whose state is set to not started
Active - tasks whose state is set to Active
Awaiting Data - tasks whose state is set to Awaiting Data
On Hold - tasks whose state is set to On Hold
Pending - tasks whose state is set to Pending
Reopened - tasks whose state is set to Reopened
Complete - tasks whose state is set to Complete
Archived - tasks whose state is set to Archived
Deleted - tasks whose state is set to Deleted
You can click any folder to view only tasks in that category.
Also, the View Tasks screen appears in the right frame, listing all tasks assigned to you, or assigned by you.
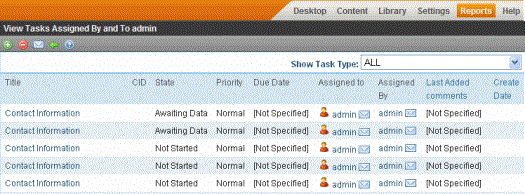
From this page, you can view, sort, update, or add tasks. To learn more about the View Tasks screen, see Viewing a Single Task.
To learn about sorting by Task Type, see Sorting Tasks By Task Type.
Creating a Task via the Task Folder
To create a task, follow these steps.
1. From the workarea, choose Reports > Tasks.
2. Choose Assigned by and to me.
3. Click Add ( ).
).
Warning! The Add button only appears if your system administrator has granted you permission to add tasks. For more information, see Task Permissions.
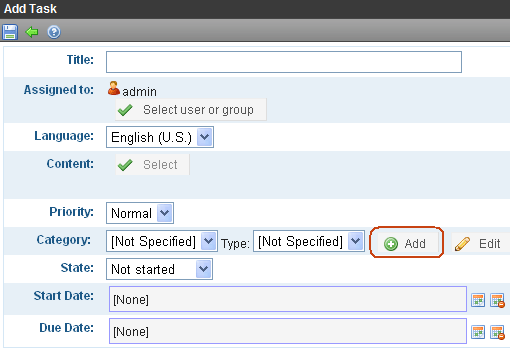
4. The Add Task screen appears.
Enter information for the task using the following table
|
Field |
Description |
|
Task Title |
Enter a title for the task (for example, Update Content). The title appears in the left column of the View Tasks screen. |
|
Your user name appears. If you do not have Redirect permissions, you cannot assign tasks to other users. If you have Redirect permissions, your user name appears followed by Select User or Group. To assign the task to yourself, proceed to the next field. To assign the task to someone else, click Select User or Group and choose a user or group. (The user to whom the task is being assigned must have permission to edit the content.) When you complete the screen, an email is sent to the selected user or user group informing him of the assigned task. Note: email is only sent if email notification is enabled for Ektron CMS400.NET. |
|
|
Language |
Select the language of the user who will perform the task. |
|
If this task involves a piece of content, select it. When you click Select, a new window appears. From this window, you can navigate through folders to find the content. You can only select a piece of content whose language matches the user language selected above. See Also: Selecting Content for the Task |
|
|
Select the priority of the task. Your choices are High, Normal and Low. The priority appears on the View Tasks screen. A user can sort tasks on the screen by priority. |
|
|
Task Category |
Select a category for the task. When a Task Category is chosen, the Task Type drop down box is auto filled with task types associated with that category. |
|
Task Type |
Select the Task Type for this task. You must specify a Task Category before you assign a task type. See Also: Adding a Task Category and Task Type. |
|
Add |
By clicking the Add link, you can add Task Categories and Task Types. See Also: Adding a Task Category and Task Type Note: If you Add a Task Category or Task Type while adding a task, the task information (Task Title, Assigned To, Language, etc.) entered will be lost when the screen refreshes. |
|
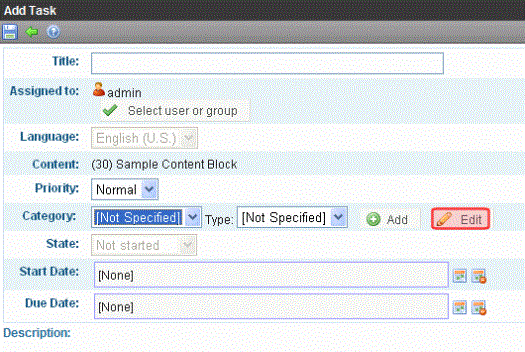
Edit |
By clicking the Edit link, you can edit the Task Type chosen in the Task Type drop down box. See Also: Editing a Task Type Note: If you edit a Task Type while adding a task, the task information (Task Title, Assigned To, Language, etc.) entered will be lost when the screen refreshes. |
|
Choose a status for the task. Your choices are: Not Started In Progress Completed Waiting on Someone else Deferred If the task is not linked to content, you can assign it to any state. However, if you later link the task to content (via the Content link above), the state switches to Not Started. The state appears on the View Tasks screen. A user can sort tasks on the screen by state. |
|
|
Using the calendar button, choose a start date for the task. The start date appears on the View Tasks screen. A user can sort tasks on the screen by start date. Note: If you see a mix-up of the month and date of your entry (for example, you select March 2 but see February 3), make sure the date format specified in the Windows Control Panel Regional Settings dialog matches your current language. Also, make sure the settings apply to the default user. |
|
|
Using the calendar button, choose the date by which the task needs to be completed. The due date appears on the View Tasks screen. A user can sort tasks on the screen by due date. Note: If you see a mix-up of the month and date of your entry (for example, you select March 2 but see February 3), make sure the date format specified in the Windows Control Panel Regional Settings dialog matches your current language. Also, make sure the settings apply to the default user. |
|
|
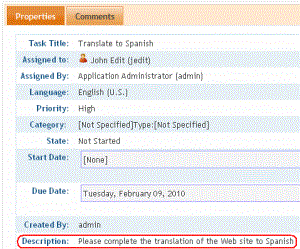
Description |
Add additional information to describe the task. The description appears on the View Task screen (circled below).
|
5. Click Save ( ).
).
If email notification is enabled, an email is sent to the user or group to which the task was assigned.
Selecting Content for the Task
When you choose Select Content from the Add Task screen, the Select Content screen appears. It shows only content in the selected language.
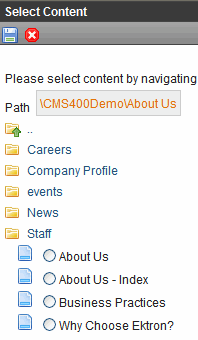
You should only select a content folder for which you have permissions. See Also: Folder Permissions
To select a piece of content to assign to the task, follow these steps.
1. Navigate to the content. (Click any folder to open it.)
2. Click the circle to the left of the content.
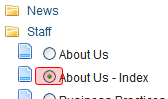
3. Click Save ().
Adding a Task Category and Task Type
Task Categories and Task Types let users and administrators sort task by user-defined categories and types.
By clicking the Add link, located next to the Task Type drop down box, you can add Task Categories and Task Types. This allows you to add categories and types without leaving the Add Task screen.
Note: Administrators can also add and edit Task Categories and Task Types from the Workarea by clicking Settings > Configurations > Task Types. See Also: Adding a Task Category and Task Type
To add a Task Category and a Task Type, follow these steps.
1. Go to the Add Task screen, as described in Creating a Task via the Task Folder.
2. Click the Add link, next to the Task Type dropdown box.
3. The Add Task Type screen appears.
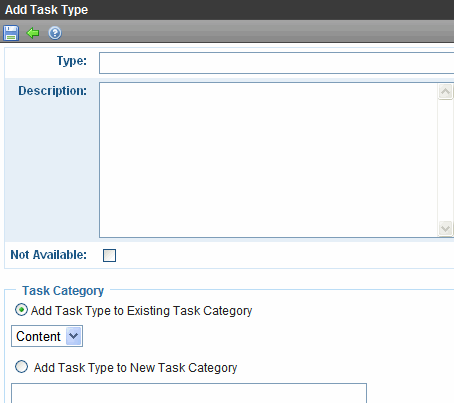
From this screen you can perform the following:
Add a task type to an existing task category
Create a new task category
Add a new task type
Add a task type description
Define task type availability
Note: As a user, if you set the Task type to Not Available, you cannot edit the Task Type after that. To make the Task Type available, see your administrator. Task Type availability is explained in Task Type Availability.
4. Enter your information.
5. Click Save ().
6. Your new Task Category and Task Type appear in the drop down boxes.
Task Type Availability
Task types can be hidden from users by clicking the Not Available check box in the Add Task Type and Edit Task Type screens. By making Task Types not available, you can make the Task Type unavailable without deleting it.
Editing a Task Type
From the Add Task screen, you can edit a Task Type. This will allow you to change the Task Type name, Task Type description, and Task Type availability.
To edit a task type, follow these steps.
1. Go to the Add Task screen, as described in Creating a Task via the Task Folder.
2. Choose a Task Category and the Task Type to edit.
3. Click Edit, next to the Task Type dropdown box.
4. The Edit Task Type screen appears.
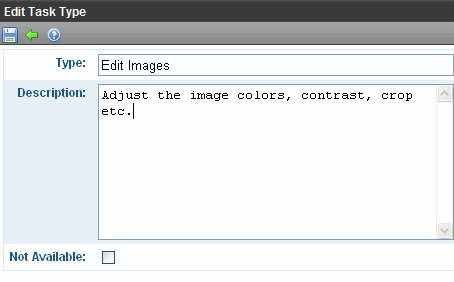
From this screen you can edit the following:
Task Type
Task Type Description
Task Type Availability. See Also: Task Type Availability
Note: As a user, if you set the Task type to Not Available, you cannot edit the Task Type after that. To make the Task Type available, see your administrator. Task Type availability is explained in Task Type Availability.
5. Edit the information.
6. Click Save ().
7. The Task Type information is changed.


![]()